The Mint Shop

The Mint Shop

Thursday, 4 November 2010

Kim chee - or Korean cabbage


Now, I have this friend who one never knows where he is and tends to disappear in the air like that. Mystery. But when he is around, he's lovely. One of those that you know you can wake up at 4am to come and rescue you. And one of those with whom conversation seems was just put on hold and can be picked up as you have seen him ten minutes before. You know what I mean.

Last week it was his birthday and, I must admit, thanks to Facebook, I remembered to ring him and leave a cheerful message on his answering machine (quite typical). Surprisingly I got called back only two days later.

As he was just back from Korea, he thought it was a nice idea to prepare Korean food. The one you eat in the country side, what my friend calls peasant food. What I had when I stopped in Seoul had probably the same social extraction. Tasty, but quite simple. The ingredients were: Roman lettuce (I'm sure they use a slightly more local one), chopped chillies, garlic, rice cooked with some soy sauce, meat or vegetables coated in chilly and lightly fried, and the secret ingredient: kimchee.

We could talk about kim chee for hours. It's a bit like cod in Portugal or sheep cheese in Italy. The variants are endless. And (according to the locals) they all taste different.
So, kim chee. It is Chinese cabbage which gets fermented in enormous quantities with water, vinegar, ginger, scallion, pepper and sugar. Koreans keep it in barrels for months so that you have 9 months kimchee, 6 months kimchee, 3 months kimchee etc. A bit like whisky or wine.


To me it probably tastes a bit like German krauti with a kick. It is actually not bad. Well last night we had it with all the ingredients listed above. I must admit that it was a bit of a messy business. And considering that my friend forgot to give us napkins, I was glad that I knew I needed to wash my jeans the day after. (Uh, this reminds me I need to put them in the washing machine!).

What you do is: take a leave of lettuce, put a spoon of rice in the middle of it, add the kimchee, a couple of chopped garlic pieces and chillies, and a few bits of vegetables dipped in a yummy sauce. Then, if you can, you make a little bundle and yum it up. As I was greedy and tried to stuff it as much as possible, the gentle bundle fell apart dropping rice and cabbage everywhere. And as I wasn't allowed to use my chop stick as it would have been considered impolite (because it is used to fish from the communal bowls) I sadly left behind a lot of ingredients....sigh!

Apart from the soup, we had everything else that is on the table in this photo I took in a village near Seoul. There I was also gifted with a big slab of steamed liver (yak!)


The magic sauce. It can be used as a healthy starter with crudités. All you need is:

100ml soy sauce
2 tbsp sesame seeds oil
2 garlic cloves finely chopped
half a red chilly
juice of a quarter of a lemon

We dipped (and dipped, and dipped...I couldn't stop myself) leaves of lettuce. But you can use strips of pepper, slices of mushrooms, potatoes.... I'm sure that everyone knew it years ago, but I never did. And it can be used to marinate fish as well and then lightly pan fry it.
A sauce for all seasons!

Like Japanese, Korean (at least South Koreans) love to display their food in very pretty arrangements. Amazing the attention they give to all the little details. The food in the shop windows is clearly made of plastic (it would go off quite quickly I guess, in which case not very pretty anymore!).


I have posted a few photos I took when I was there. It was freezing cold and it had just snowed. I went from the C32 with 80% humidity of Bali to the 2C with snow in Korea....body shock! The details of the temples (very few left in the middle of the city) were fantastic. As well as the prayers left hanging outside of the school with balloons of different colours.


The fish bring luck because it is brings wealth and puts out fires!


I love the mini Buddha in the hole of the tree. Buddhism is the main religion there but Christianity and Confucianism also co-exist.

Tuesday, 2 November 2010

Autumnal risotto


One of the things I don't seem to stop marvelling at are the colours we get at this time of the year. I probably sound like a broken record but I cannot help myself from crying out "look at that, honestly, isn't it amazing? That is why I find really sad, almost disturbing, that shops have such little imagination that they can only think of Christmas decorations. What about all these fantastic leaves, pumpkins (of all shapes and colours), mushrooms, berries, etc, etc?


Cambridge in October blows you away. The colours are blustering. Days are still mild with not much rain. And there are not as many tourists around as in the Summer - and therefore the entrance to all the colleges is free at any time, and not just after 5pm!


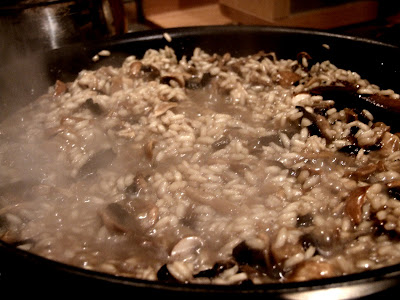
So, to continue with the seasonal theme, last night I made porcini risotto. This is a dish which I would suggest if you have dinner parties and want to avoid being flustered around the kitchen dealing with multiple moving ingredients at the last minute. The joy of a risotto is that you can start preparing it and cooking it beforehand, and finishing it just before being served. If you are using good risotto rice like Arborio or Carnaroli rice, you won't risk to get a mushy pap.

Ideally you should use fresh porcini as well as dried porcini. But I know that this would be impossible, so the best types of mushrooms you can replace them with are chestnut mushrooms. They have a lovely nutty and earthy taste. Also, if you can find it in a good Italian deli, another secret ingredient is porcini stock. Added to the water, it adds a lot of flavour.

Porcini Risotto

For 4 people

400g Arborio or Carnaroli rice;
300g fresh mushrooms;
100g dried porcini;
1l hot water;
2 garlic cloves;
1 porcini stock (or vegetable);
1 glass of red wine;
1 handful of parsley;
100g parmisan;
a knob of butter;
2 tbsp olive oil

1. Peel and chop into half the garlic cloves. In a pan golden up the garlic with the oil. When the oil is warm and the garlic has started getting colour, add the knob of butter and let it melt slowly.

2. Place the dried mushrooms in a bowl with warm water and cover. The mushrooms will need to soak up some of the water.

3. Add the rice to the pan and toss well to ensure that all grains get coated with the butter/oil. Continue until the rice looks golden.

4. Make the stock with hot water. Add some of this water to the rice (it will fizzle a bit). Add some of the fresh mushrooms and stir well.

5. Add to the rice the water where the dried porcini had been soaking. Chop in small pieces the dried porcini and add them to the rice.

6. Continue adding the stock and porcini water to the rice. It must never be dried and the grains must cook slowly. The rice will acquire a lush glossiness. Add salt (probably 2 tsp) to taste.


7. Add the rest of the fresh mushrooms. When the rice is almost cooked, add the glass of wine and let it evaporate.

8. When the rice is practically cooked, add the chopped parsley.

9. Sprinkle the grated parmisan and mix well. Serve with a few parsley leaves and more parmisan on top.


Monday, 1 November 2010

Chocolate and Rabbits for Halloween


I forgot to tell you that I am part of a cooking group (http://muchpru.homelinux.org/cooking/?page_id=9). There are 5 of us from different nationalities (English, French, Italian and Japanese) and the idea is to meet from time to time and teach one or two recipes from our country. As my cousin Giulia was visiting for the weekend, and Halloween was around the corner, I thought of bringing a slice of Tuscany to Cambridge to celebrate Autumn and All Saints.

Tuscan food is quite simple and earthy. Nothing too fancy. Just genuine, frank flavours with some Medieval touches. Most of it was developed at the court of Caterina dei Medici who brought with her some of her favourites. I am sure nobody knows that the original recipes for crepes and canard a' l'orange were in reality introduced to France from Florence, and I am not making it up! It is based on historical records - but I am sure that no French person would believe this story. Tant pis!

So rabbit with black olives, rosemary and garlic is a very traditional dish from Siena. But please don't even start looking at this recipe if you are squeamish even in the slightest! I have warned you...so don't blame me for shaky legs or sudden sickness!

The meat was locally supplied from the Mill Road butcher - probably one of the best in Cambridge (this is once more in support of our Romsey Town Heaven!).


I would recommend that you ask the butcher to chop the rabbit and clean it as much as possible before you start cooking it. Also make sure you leave it in a bowl with running tap water for at least an hour (I know this sounds like an awful waste of resources but believe me if you don't you will feel like gone back to nature, a bit too much in fact!). I would also suggest that you are away from the kitchen and cannot hear the noise as it does turn into a real Chinese torture after only 15 minutes....

I might not have sold this rabbit very well. True. But it can taste divine - Alison can confirm (she had three servings!).

Rabbit with olives, rosemary, and garlic ("Coniglio alla Toscana")

a medium rabbit (approx 1kg);
150g black dried olives;
2 long sprigs of fresh rosemary;
3-4 garlic cloves;
half a glass of red wine;
4-5 tbsp olive oil;
600g potatoes

1. Pat dry the rabbits pieces (warning! this caused dizziness and sickness in one of our cooking members...who didn't faint though...phew!) with kitchen paper (rather than a towel as the smell that leaves is hard to remove despite two washings!).

2. In a large medium deep frying pan (a casserole would also do), heat the oil with the garlic and rosemary until the garlic is slightly brown.

3. Add the rabbit pieces cooking quickly on each side. Add the wine and let it evaporate.

4. Reduce the heat and add the olives. Cover and simmer for at least 25 minutes. The bottom of the pan will have a sticky layer of fat and olives which you can just scratch gently and add to the rest of the dish.

5. Separately cook the potatoes chopped in a 2-3 cm pieces in abundant salted water. Once they are half way cooking, drain them and add them to the rabbit. Stir well to ensure the rabbit oil covers the potatoes.

6. Serve hot with some mixed salad on the side.

The photo below was taken before the potatoes (and before the camera died).

I know that you are expecting the chocolate recipe too. I hope you have managed to read till now - and haven't been put off by the cute rabbit....

This chocolate cake is heaven. Not only because does it taste fantastic but also because it doesn't have many calories. So double good!

Dolce al cioccolato fondente (Fondant chocolate cake)

3oog dark chocolate (Sainsbury's basic will do perfectly well);
4 eggs;
4 tbsp sugar;
300g butter;
2 tbsp flour;
1 espresso cup

1. Pre-heat the oven at 180C. Melt the chocolate in a bowl on a boiling pan. Add the butter and incorporate well. Add the espresso and mix well. Let it cool.

2. Separate the eggs. Beat the yolks with the sugar and add them to the chocolate mix. Beat the egg whites until firm.

3. Add the flour using a sift to the chocolate mix. Mix well to ensure there are no lumps. If there are use a whisker and they will disappear.

4. Fold the beaten egg whites to the chocolate mix (with a clock-wise movement from down to up) with a metal spoon to avoid the air created in the whites doesn't disappear.

5. Grease and flour well a 20cm baking tray. Pour the mixture into the tray and cook in the oven for 30 minutes at C180.

The photo was taken only a couple of minutes after the cake was brought to the table. So you have an idea of how good it was!!


Thursday, 28 October 2010

Moroccan flavours


Last night I felt like something spicy. And escape a bit somewhere warm and magical. While I was having a break sipping my cup of Earl Grey tea and munching a ginger biscuit, my eyes rested on a tin of cayenne pepper. And thought that a tagine would a have been the perfect combination.

I've heard many people complaining that in Morocco one finds nothing but couscous and tagines, tagines and couscous. It is true, most of what you get in restaurants do involve one or the other, if not both. But there is more to that. Or at least the flavours can change (a bit) and in any case I love them so much that I really didn't mind!

Morocco has always been a place which has occupied a special fantastical place in my imagination (the real Thousand and One Nights). And when we eventually went, nothing disappointed me. On the contrary, everything was even better than expected. Smells, colours, noises from the market or street vendors, all mix in a grand bazaar.

I cannot deny that there are no annoyances. There are, or better, there can be. But only if you are somebody who starts talking to anyone on the street and starts following him into some remote Berbere market (because of course, everything is Berbere down there, not Arabic) and to some amazingly stinky tanneries.


So what did I cook in the end? Fish Tagine!
This dish is great because you can also prepare it in advance, then simply bang it in the oven and forget about it for at least an hour and even if you leave it there for a bit longer (once you've switched the oven off), that doesn't matter as this even intensifies the flavour.

It is very colourful so always ideal for dinner parties. And if you cook it in the actual tagine itself, you can also serve it straight to the table, removing the lid in front of your guests and expecting a "wow....uhhh".

I had a similar tagine in Essouira. I loved that place. It is so calm and peaceful with white washed houses and blue doors (that blue blows you away), a lively fish market by the port, and a constant breeze blowing over the rampants. If you are in Morocco, do make a detour down there. The impression you will have compared to Marrakesh is totally different. No hassles at shopping and no constant interest from the locals.


We stayed in this lovely guest house right on the cliffs. I had a seagull staring at me for a worrying minute, completely still in the air, while I was eating my semolina pancake (very typical for Moroccan breakfast) with honey. Surprisingly the place was called The Seagull (Dar Al Bahar). Don't leave the place without having savoured a pigeon or prawn pattie (pastilla) or eaten at a fabolous restaurant called Les Alizes' tucked away in a little alley and only lit with candles. Great atmosphere, and not just for the tourists!


Fish Tagine

For 4 people

4 fish fillets (cod or any white fish);
1 tin tomatoes;
1 onion;
2 garlic cloges;
1 tsp cinnamon;
2 tsp cayenne pepper;
2 tsp paprika;
1 tsp cumin powder (I used seeds instead and the result is the same);
3 handfuls of fresh coriander;
2 handful of fresh parsley;
3 tbsp olive oil;
juice of half juice;
4 large potatoes;
2 peppers (red and yellow if possible as it guarantees more colour)

1. In a mortar (or a in a mixer for the modern and busy Berbere dame) mix to a paste all the herbs, garlic, spices and oil. Squeeze the lemon juice and mix well. This is called chermoula.

2. Marinate the fish (cut into 4-5cm long pieces) in the marinade for at least 1 hour (you can make an express tagine and do it even in half an hour if you cook the fish in a pan using a lid to ensure that the flavour intensifies quickly and the fish absorbs it.

3. Chop the peppers and the onion.

4. Peel and slice the potatoes (if you have decided to make the express tagine, then cook the sliced potatoes in boiling and salty water to speed up the cooking time) and place them on the bottom of the tagine or a deep oven tray.

5. Place the peppers, onions, tomatoes on top of the potatoes and then the marinated fish. Cover and place in the oven (if you are using the tagine make sure that it can go into the oven as some of them might crack as they are supposed to be used only on a hob).

6. Cook the dish in the oven for at least 1 hour at 200C. Serve it with couscous which you will have cooked separately in a pan by adding to the grain 2 tsp of salt (for 300g couscous), 1 tsp turmeric, and 1 tsp cinnamon and then covering it with enough boiling water to cover it more than a finger. The coucous must absorb all the water so make sure that the lid is closed and you never peer through. You can add a knob of butter to separate the grains with a fork.

By the way, tagine is, as I am sure you know, being the well-travelled sophisticates that you are, the utensil with the conic hat in which all the ingredients get cooked rather than the dish itself. In Morocco you can find all kid of tagines - sizes, colours, patterns. A tagine for every season.


I've always loved the Yves Rocher bag.

Wednesday, 27 October 2010

We don't want Christmas decorations!


Yesterday I made my monthly appearance to the shops in the centre of town. You must know that where we live it feels like a real village community despite being only 15minutes walk from the main market square of Cambridge. Shops are local (the photo above was taken in the organic UrbanLarder) and don't belong to big chains (I am ignoring the newly opened Tesco, for me that doesn't even exist), people are friendly and recognise you so will say hello and smile. This heaven is called Romsey Town.

Well my decision to have only monthly visits to Cambridge is a clever one. But I wish I had stretched it to two months..... Christmas decorations are out already!! On 26th October. I couldn't believe it. This year they haven't even waited for Halloween ...one switches from beach barbeque sets with colourful Pimms' glasses to fake snowy peaks and made-in-China baubles. I find it slightly worrying.

I find Autumn colours so inspiring... I'm sure we could fill our shopping windows with leaves, pumpkins, and mushrooms (without turning the shop into a garden centre). As I said before, I will never ever again buy strawberries in January and my kitchen will be filled up with seasonal smells. So today I made the Autumnal soup par excellence.

Autumnal soup with Ricotta

100g butternut squash (or pumpkin);
100g parsnip;
50 celeriac;
half onion;
1l vegetable stock;
100g ricotta;
1tsp chopped thyme and rosemary (each);
100g kale;
1 tsp soy sauce

1. Make the soup. Peel all the vegetables and chop them small so that they cook quickly.

2. Chop the onion very finely. In a pan (the size depends on the amount of soup you want to make) cook the chopped onion in a couple of spoons of oil until golden. Add the herbs and toss well. Add a tsp of salt.

3. Make the stock and pour it onto the cooked onion. Let it babble for a minute. Add the vegetables and close the pan with the lid.

4. When the vegetables are cooked, blitz to make it smooth (to the horror of my husband who calls this a "baby-meal").

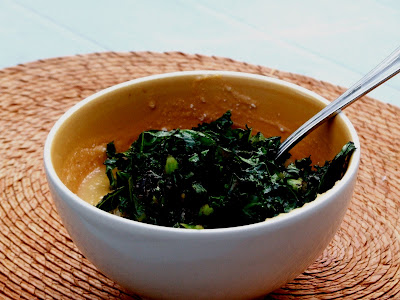
5. In a separate pan, warm a table spoon of oil and when it's hot (you can tell when the oil starts babbling - I wouldn't suggest to stick your finger in it!), drop the kale all at once so that it sizzles quickly. I love this sound! Let it crinkle for a minute, add a splash of soy sauce. Remember that soy sauce is quite salty so you won't need to add extra salt to the kale.

6. Spoon some of the soup into a bowl and add the ricotta and incorporate it with a spoon. I also added a few leaves of basil as I still have some persevering plants on my window sill.

7. Add the sizzle kale on top of the soup.

As always, I'm too greedy and never remember to take a photo before I start tucking into my dish! So you might notice bits of soup already on the sides of the bowl....I think I also exaggerated with the kale on top of the soup....


The weather is still good enough to enjoy lunch in the garden. The leaves on our patio are still hanging on there but I feel not for long. The colours are great though. There are even some enduring flowers which kept me company while I was devouring my soup...

Tuesday, 26 October 2010

The last carrot crumbles


Today I have finished the last slice of the carrot cake I made on Sunday for my friends. They all seemed to enjoy it. And they looked honest. I need to practice at taking good close shots of food - I'm seriously considering cultivating this passion for food and photography. Who knows if something in the future comes up?

At least I am already in the right environment. Helping poor people from hunger. A bit the other side of the spectrum though. Food security v food abundance. I think food (well this thought is not that original and I am not the first person who has said it) has a central role in people's life. Most of our celebrations are around food. And funny but true, some of our best travelling memories involve food in a way or in another.

Anyway, going back to my cake. Here is the recipe I got from the website. It is a GoodFood recipe which I adapted slightly (a bit less oil and sugar and sandwiched filling rather than just on the top). I think the recipe could be adapted to cupcakes, just distribute the mix into the little cups (up to 3/4) and bake for 20-25 minutes instead of 35.

Sandwiched Carrot Cake

150g raising flour;
1 tsp bicarbonate of soda;
1 tsp baking powder;
2 eggs;
130g caster sugar;
250g coarsely grated carrots;
125ml vegetable oil;
1 tsp vanilla essence;
2 tsp cinnamon powder;
150g cream cheese;
200g icing sugar;
50g butter.

1. Preheat the oven to C180.

2. Sift the flour and mix the soda and baking powder. Add the cinnamon.

3. Grate the peeled carrots (not too fine as if you were grating cheese for your pasta) and add them to the floury mix.

4. Beat the eggs and add the sugar and vanilla. Mix well.

5. Add the oil to the eggs.

6. Add the wet mix to the dry mix and incorporate everything well to ensure all the ingredients are sticking together.

7. Pour the mix into two small sandwich tins previously greased. Place them in the oven on the same level and bake them for 30minutes at C180.

8. Remove the cake from the oven and let it cool down on a rack for at least 20 minutes. I left mine resting for the entire night and I believe the flavour intensifies. The advantage is also that you don't have to rush and do lots of things at the same time in case you are cooking more.

9. For the filling and icing. Mix 150g cream cheese with 50g butter and 200g icing sugar. Use half of this mix to fill the cake by distributing on top of one of the cakes.

10. Place the second cake on top so that the filling can be seen and gives a pretty effect. Spread the other half of the filling on top of the second cake using a fork so that you can give some nice ridge effects. Sprinkle some grated carrot on top to garnish.

I know that by posting another cake I shew away all my "male readers" as for some reasons men don't seem to like baking while women do. Is it because men want to control what they do? Or because women are naturally a baby-oven? Mhmmm....I wonder..

Some food shots at the market


There is nothing more expressive than food...


Saturday, 23 October 2010

A sweet wake-up


Today I knew I had to work. So I knew there was no long and lazy brunch for me. But I thought I had to experiment something I could blog about, even if it had to be quick. Actually that was probably better. So I lulled between the idea of an Egg Benedict - too early for something that filling - and a simple almond croissant - which I would definitely not have made myself though.

Eventually I rested my mind on a banana pancake. The original recipe suggested to use only buckwheat flour. I wasn't convinced. I have tried it before and it gives this chewy bready consistency which would dry out almost any other ingredient.

So I changed it and the result was not that bad. I must try it again, probably tomorrow morning. Call it dedication or insanity but until I am pleased with what I eat, I don't give up. (Unfortunately neither all those who are close enough to me).

Creamy banana pancakes

2 eggs;
75g plain flour;
45g buckwheat flour;
1 tsp baking powder;
2 tsp cinnamon;
1 tbsp treacle;
2 tbsp double cream;
1 tsp ginger;
150ml fat (or at least semi-skimmed as otherwise you just add water!) milk

1. Mix the egg yolks with the treacle, the sugar and the spices. Beat well to make sure that the sugar and treacle melt or at least get incorporated into the eggs.

2. Beat the egg whites until firm and fluffy. You can add the famous pinch of salt which is supposed to help the whites to stiffen up; personally I don't see any difference. But do if that makes you feel more comfortable!

3. Add to the eggy mix the milk and cream, and beat well.

4. Mix the two flours and the baking powder together.

5. Slowly add the flour sifting it (and I am proud to say that we finally have one, so no more tea strainer!) into the eggy mix. Beat well to avoid lumps. The batter has to have a thick consistency.

6. Leave the batter to rest for at least 15 minutes.

7. Melt a knob of butter in a pan and when it is melted and about to bubble, add a ladle of batter to form a pancake. You can decide the size; they can look like petites Russian blinis or massive American pancakes (like those you see in films!).

8. If you are making more than one, preheat the oven to 100C and keep each pancake while you are making them in the oven before being served.

9. When the pancake is almost cooked, slice a banana and scatter a few slices on top. You can either fold the pancake or just let the slices sink in the batter and become part of the pancake (this is what we did).

10. Serve warm, with a dollop of cream and sprinkle of cinnamon.

P.S. Today, Sunday, we used the leftover of the batter and turned the sweet pancakes into savoury ones by adding extra mature cheddar, and chive and served with wilted spinach and crispy bacon. The result I must confess was fantastic, better than the original recipe!!

Wednesday, 20 October 2010

A very green soup


Last night I was zapping around (is this the right word? mmm....probably not) the iplayer programs - it's true, we STILL don't have a telly (so what?) - and bumped into GUESS WHO?? Nigella, of course! Or maybe it was my subconscious that drove me towards her kitchen...

I cannot hide my horror at her inspired spaghetti with Marmite....blargh!! And once again she came back with a science-fiction story that Italians recycle the oil/sauce from their Sunday roast to dress their pasta on Monday. I think there must have been some cheeky Italian who took the real piss out of her. NON E' VERO!

And does she really have a fur apron? Well if so, I guess that's just fine....but I suspect there is somebody there who tells her to be provoking and open wide her black eyes at the camera while she ravages her larder, which is probably the size of my living room. Mhmm..

Well, at least I had a nice and healthy soup just before that. It was all a bit green to confess, but if it is your green day then you'll be ok. The original recipe (thank you Ilva for it!) wanted shrimps which I didn't have and couldn't be bother to go to Coop in the rain. So if you want to try it with the shrimps, do and let me know. I added basmati rice on the side.

Leek and Spinach Soup

Makes 2

One medium (length-wise) leek;
3-4 handful of fresh spinach;
a knob of butter;
1 tbsp oil;
200ml vegetable stock;
200ml fresh single cream;
1 bay leaf;
50ml milk.

1. Cut the leek in medium rings and cook them in a deep pan with some butter and a spoon of oil until tender.

2. Make the vegetable stock and pour it onto the leeks. Let simmer for a couple of minutes. Then add the cream and the bay leaf, and simmer for another few minutes.

3. Remove the bay leaf (if you leave in the cream for too long it starts tasting very terrible as it is quite strong), and add the milk to make it creamier.

4. Blitz everything and if necessary pass it through a colander to make it smoother. Add salt to taste and a touch of pepper.

5. Make separately the basmati rice. For 200g rice you need enough water to cover plus a finger above the level. Add to it a couple of knobs of butter, a tsp of salt, few leaves of jasmine tea, a cardamom and a starred anise.

6. Add the spinach to the soup which will only take a minute to wilt with the heat.

7. Pour the soup in the bowl adding in small quantities the rice which has been served separately. The rice functions as a form of bread.

Very filling and warming! The photo was taken half way eating it as I had forgotten. It's not great but just wanted to show you how fantastically green it is!


Tuesday, 19 October 2010

A pear encounter

More and more I think it is ethically wrong to find strawberries in January, or cherries in November. And I get really grumpy when I discover that my butternut squash comes from Greece or potatoes from Kenya...without wanting to sound too Daily Mail we-don't- want-foreign- food- here but.... "don't we grow this kind of stuff here?" Humph, humph...

I don't expect people to eat cabbage and parsnips for 6 months a year, but at least that our kitchens get synchronised a bit more around seasons without mobilising planes from God-knows-where.

This week I was supposed to travel to Mozambique but to my joy I didn't - I know, I know, I am really ungrateful to the blessing I have. And this is the worst part because when I say to people "Oh yes I have to give a workshop at a beach resort in Mozambique" then of course everyone says "Oh wow how cool!" To which I feel a complete brat. But the point is that after a while you do it, you don't fancy that much packing again, spending at least 18 hours between planes and lounges (however swish the Heathrow T2 one can be), and stuffing yourself with what my colleague calls "medication" - makes me feel I'm nuts.

In any case, as I happened to be in rainy England I thought of taking advantage of a great spot we discovered last year for a proper back-to-nature harvesting. Within 50 metre distance you literally bump (ok maybe not literally) into walnut, apple, and pear trees. However, to our deep disappointment the walnut tree had already dropped all its shells and the apple tree to make no apples whatsoever. Very sad indeed.

Our search though was not all in vain. The pear tree was in full abundance. A bit high up - and not just for me.... but with some primitive tools that mother nature provided I hit enough branches (as well as almost killing my husband) and caused a generous fall. Our month's provisions has been secured.

Now with such an opulence, I have come up with all unimaginable recipes that involve this key ingredient. I looked through one of my favourite blogs (luculliandelights) and I thought that Pear and pine nut semolina cake sounded absolutely scrumptious. What is great about this cake, isthe crunchiness and coarseness of the semolina; and that is why I would highly recommend that you eat it when it's still warm - shouldn't be difficult if you are as greedy as I can be. Also the longer you leave it, the more the taste of cardamom intensifies.

Pear, Cardamom, Apples and Pine Nut Cake

For a 20cm baking tin

280g semolina;
70g self raising flour;
400ml milk;
3 eggs;
100g butter;
200g sugar;
1 tsp cardamom;
3 tbsp pine nuts;
2 medium soft pears
1 soft apple (cox)

1. Mix the flour with the semolina and the cardamom.

2. Melt the butter (thanks God you don't have to soften it up and mix it with sugar which is one of those horrid things that cake recipes ask you to do) and mix it with the sugar. Then add the milk and bring it to boil.

3. Whisk the eggs and add to the milky mix once it has cooled down a bit or you'll make an omelette. Mix well.

4. Pour the milk/egg mix onto the semolina (I know this will sound very unorthodox but it does work). Leave it for a minute so that the semolina absorbs the liquid and then mix well.

5. Peel, remove stalk, and cut the pears into slices.

6. Grease and flour the baking tin. Pour the mixture in it.

7. Arrange the slices of pear and apple on the surface of the cake, sprinkle the pine nuts all around the surface. Finish with a touch of sugar sprinkled on top which will slightly caramelise.